Curb Appeal

7017 Meandering Creek Before Improvement

We often have buyers who have a home to sell.  The most common advice that their Realtors tell them to do to sell their homes quickly is to work on their curb appeal.  Now to some people that might sound like a huge task, but it can be pretty easy and fairly inexpensive if you are willing to put a little elbow grease into it!

We have a home for sale at 7017 Meandering Creek in Parkview Hills that has an elevation that we don’t have any professional pictures of.  We decided that we wanted to get some photographs of it, but the “curb appeal” was a little blah.  We usually save our professional photos for our model homes and they usually have a little extra landscaping, so this was going to have to be a quick project.  I thought it would be an excellent opportunity to demonstrate curb appeal!

So, of course I volunteered to be the landscaper for this one!  Since it is a new home, there weren’t any dead trees to remove or major overhauling to do.  I thought that a little black mulch would stand out against the white limestone accents on the home and pairing that dark mulch with vivid pink flowers might be the most eye catching combo.  I was really excited to be able to buy beautiful sun loving flowers since my own personal garden is so limited.  I was going to live vicariously through this East facing sunny garden!

My first stop was Mike’s Garden Center.  I love Mike’s because they warranty their plants and they have early bird specials and sales all the time.  If you catch a good special you can find flowers for sale at $0.73 per 4” pot.  Amazing!  Another reason I love my particular Mike’s on Crowley Road is because they are pet friendly.  They have their own birdcage and their own shop kitty and three small dogs.  One of them accompanied me as I selected my flowers.  I loved it!

I bought Vinca and Moss Rose.  I love Moss Rose because it is a creeper.  It will fluff out and go everywhere.  Also it drops seeds like nobody’s business and you will have Moss Rose coming back every year.  And, it doesn’t need a whole lot of water.  Don’t get me wrong, it needs to be watered, but it is very forgiving of this Texas heat and doesn’t mind drying out a bit.  So I loaded up my three flats of Vincas (on sale!) and my one flat of Moss Rose and bought my black mulch.

Of course with all of these plants I needed help getting out of there.  The folks who work at Mike’s are always so nice and one guy helped me load up my car.  No, you don’t need a truck to haul plants and mulch.  I have a two door hatch back and I can get anything in there!  I laid down my seats and spread a blanket over the trunk and seats to keep it from getting soiled and me and my Mike’s buddy loaded up my car.

Filler Up!

There's room for more!

When I got to the home I quickly took a couple of “Before” pictures and got to work.   I have found that it is easier for me if I lay the plants out where I want them to go first.  So I unloaded all of my flats and got to work.  I knew I wanted the Moss Rose to go along the walkway to the entry since it would look pretty there as it began to creep out of the flower bed once it became established.  Vincas will get thick, so I also wanted to make sure I placed them far enough apart to not compete with each other for sunlight.  I also wanted to make sure I planted thickly against the ugly white washout stub in the flowerbed.  You know that thing that looks like a pipe with a lid on it?  You have got to be careful when you are gardening not to completely cover it since you need to know where it is in case you have to snake your sewer line out to the street.
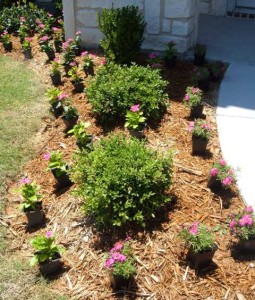
Ready for planting


Once I had my flowers laid out, I just had to get to work!  I used a little gardening spade to dig in the earth.
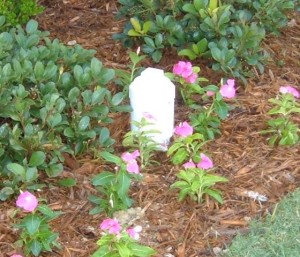
Washout pipe

As I was digging I quickly noticed that the ground was very clay-ey.  When I was at Mike’s I wondered to myself whether or not I should buy some potting soil, but I decided against it.  Well, I regretted that decision!  But, since I wasn’t removing the old mulch, just adding the new mulch on top, I figured it would be ok.  In my opinion the best way to convert a clay based flower bed to better soil is to dump lots of mulch on it every Spring and Fall.  That’s what I did at my home over the past six years and now I have this incredibly rich soil full of grody earth worms!  They make for healthy plants and occasional frights while planting.

After hours of backbreaking digging and planting, the clouds parted (not really) and a ray of sunshine (it had been sunny and sweltering all day) fell on the pretty new flowerbed.  I was pooped and the thought of adding the mulch made me have a heatstroke.  So I popped on over to Mr. Bentley’s house next door to lounge on his deck and take a couple of pictures of his awesome view.  He’s going to be the subject of the next Celebrity Gossip post.

Ruby says I need a pedicure...

The next morning I was at the home bright and early to spread the mulch.  Sounds easy enough right?  Right!  Today I was wearing my heart rate monitor because I thought I needed to know exactly what my caloric commitment was to this project.  It was a day late and the majority of it was done, but I figured I could do some math and guess.  Mulching burned 640 calories!  Yay!  Ok, way off topic.

Anywhoo, I had four bags of black mulch and I laid them out near the places I thought they would be going.  I opened each one and threw the mulch out and covered up all the old mulch.  Occasionally I had to free some leaves or petals from under a little bit too much mulch, but it was pretty quick work.  The only problem was that I forgot about the tree in the yard.  That made me a bag short.  So I spread it as best I could and it was a little thin at the end.  I was regretting that I didn’t start at the entry and work my way out.  So when I was running out of mulch, I was at the most important place!  Oh well.  Since I was sooooooooo tired after I finished, I decided I would finish the mulch the next time I was at Parkview Hills.  By the time you read this, it will all be complete.  But I did manage to take pictures with what I was able to cover and from the street, you can’t even tell I ran out!

By the end, I was pretty impressed with the effect that some flowers and mulch had on the appearance of the home.  What do you think?

7017 Meandering Creek Lane after sweat equity

Why Do We Have So Many Inspections?

When someone walks into my sales office, one of the things I am dying to tell people is that we conduct extra inspections on our homes during the construction process.  Most people just look at me blankly when I do my twirl and jazz hands at the end of delivering this precious message. 

Although the meaning of this is pretty insignificant to people who are not self-proclaimed construction nerds, I still feel this message needs a little bedazzling.  So I asked J Mason our COO who also happens to be another Graduate Master Builder (cue the jazz hands and twirling) working at Antares Homes to explain this better than I can.

“Each Antares home undergoes numerous and rigorous inspections conducted by four separate groups. The most familiar of these is of course the municipal building code compliance set of inspections. The International Building Code (together with local modifications) is enforced via multiple inspections at differing construction stages, to assure compliance with the hundreds (if not thousands) of requirements. In addition to these municipal inspections, each home also receives a ‘pre-pour’ foundation inspection, conducted by a Structural Foundation Engineer to insure that the slab is properly prepared prior to the placement of concrete.”

So, in addition to the city-mandated inspections we have a Structural Engineer give us the thumbs up before we pour!  Ta-Daa!

J also said, “Antares has also engaged a third-party firm as part of our Comfort Home program. These folks conduct inspections pre-drywall and prior to closing to verify the thermal integrity of the building envelope, the insulation installation and the performance of the air distribution system. These inspections are among the most exacting in the industry. Most builders would say ‘That’s enough!’ (or ‘That’s TOO much’). Antares, however has a third initiative, which is the driver behind an additional third-party inspection. We are committed to continuous improvement of our business, and of course construction practices are a primary focus. Simply put, we want to get it right the first time. We warrant our homes, and understand the risks associated with that, and know the best solution is correct construction.”

Well that can’t be said any better!  Continuous improvement is a cornerstone of the Antares philosophy. J goes on to say:

“A key requirement of any improvement initiative is an effective measurement system. For the past several years we have engaged Burgess Construction Consultants to conduct a thorough pre-drywall inspection on every home we build.  This inspection covers approximately 175 code and best-practice related items, and is primarily a data-based measurement system for each of our Trade Partners (you know, the guys who pour the slab, swing the hammers, install the mechanical systems, etc.). The results of each inspection are provided to the Construction Manager and the related Trade Partners, and corrective actions are taken as needed. The data is also compiled on a historical basis allowing us to measure performance on a per-Trade Partner basis. This recurring procedure has yielded significant results, with items needing correction declining to a level that outperforms the average of all DFW builders that are in the Burgess database. This additional inspection procedure is part of our ongoing commitment to provide the durable, high quality homes for which Antares is known.

And that my friends is why I get all dance-y when I start talking about EXTRA INSPECTIONS!

Ribbet Ribbet

Our Green Program is Different.

Our Green Philosophy

We start by acknowledging that building a home changes the face of the Earth for generations to come. This leads us to:

Designing the most effective and high value floor plans, and building homes which fit our customers’ budgets. We sweat the small stuff to make sure we don’t build in mistakes. We also won’t include unproven features with fancy names just to score points on someone’s ‘green rating scale’.

Using high-value, durable materials such as rebar foundations and fiber cement siding and exterior trim. This builds lasting value in homes that stand the test of time.

Minimizing wasted resources at every possible opportunity. This extends to our well-managed, ‘no-dry-runs’ construction process which means that our Trade Partners and Suppliers don’t make needless trips to any of our jobsites.

Rigorously follow EPA storm water control and jobsite management guidelines and requirements.

Most importantly, we build using the most proven energy efficiency materials and techniques which fit the budgets of our customers. Our Comfort Home™ guaranteed energy program is our commitment to what is widely agreed to be the most important of all Green features: Energy Efficiency.

We are constantly studying and analyzing developing techniques and new products to determine which are proven to perform, and proven to make economic sense to our customers. Here are some of our building practices and home features which are standard in every home, and which are recognized by the National Association of Homebuilders as required parts of any green building program:

Energy efficiency features verified by Certified, independent inspectors:

  • Thermal Bypass Inspection on every home
  • Duct-blaster HVAC test on every home
  • Blower Door Envelope Test on every home
  • Allows for the ComfortHome guaranteed heating and cooling program

Proper HVAC design and installation:

  • Use ANSI/ACCA Manual D design process
  • Use ANSI/ACCA Manual S equipment selection
  • Installation done and performance verified only by Certified HVAC contractor (NATE / BPI / RPA)
  • Ducts sealed during construction process
  • System performance @ 14 SEER
  • Ducts properly sealed and tested on every home

Water-efficient shower heads

Automatic Programmable Rain and Temperature Sensitive sprinkler systems (optional in some communities)

Energy efficient recessed lighting (per plan)

Energy Star rated dishwashers and other appliances (some appliances optional)

Avoid environmentally sensitive building sites

Timer-controlled, outside-ducted rated exhaust fans in all bath areas

Use advanced framing techniques where allowed

Provide covered entries (most plans)

Provide proper eave overhang

Provide metal drip edge at roof eave

Provide proper site drainage (min 1.20), all four sides of home

Install continuous termite and vapor barrier under foundation

Provide water resistant barrier on exterior walls

Use of recycled materials where applicable (cellulose, clay brick, OSB)

Design efficient floor plans

Thorough air-infiltration control on garage / living area common walls

Rigorously manage storm water runoff

Provide thorough home maintenance and care manual and thorough Homeowner Orientation

-J Mason

COO Antares Homes

For more information visit:

NAHB

Energy Star

Antares Homes

Form Boards and Plumbing Rough

How 'bout them pipes?

When you drive by a home site in a neighborhood that has on-going construction you may notice that some of them just have a rough outline of a slab made out of what looks like 2×4’s.  That may stay there for several weeks before anything else happens.  Placing the form boards on the home site often happens before the builder has been issued building permits and that is why it stays there for so long.  The home site is surveyed and the lot dimensions are checked for accuracy.  The home site is “benched” meaning the vegetation is cleaned off the pad site where the forms will be placed.  The form boards are set according to the footprint of the home with 2×12’s.  The form is then surveyed to make sure they are on the property and out of any easements and within the building lines.  The next step is to obtain a permit.  A City Permit is an approval from the city to go ahead with construction.  By obtaining a permit the city has agreed to inspect the home at different stages of the building process.  No builder or remodeler can legally commence work with out a permit.  The next step is a drop of plumbing sand on the building site.  The sand is for bedding the pipes to give them cushion and fall.  The plumber begins digging where all of the plumbing lines will be placed inside and outside of the forms.  The plumbing lines installed in one day.  We install Zurn PEX water supply lines.  They are better than copper lines because they require fewer fittings and are more resistant to mineral lime and scale buildup.  PEX is more energy efficient because it does not dissipate heat as readily and it is better able to withstand freeze and thaw cycles because it can expand with a freeze and work just as well after it has thawed.  Once the lines are run, they are filled with water and we leave them filled to check for leaks.  The City Inspector will come to the site and conduct a Plumbing Rough inspection of all of the plumbing lines that will be concealed in the slab.  The Inspector will also look at the fittings to make sure they are installed correctly and make sure that they align correctly with the fall of the lines that will carry waste to the City Sewer lines.  And that my friend is the process from dirt to the plumbing rough.  Thanks Certified Graduate Builder Brooks Rowe for the consult on this Blog post!